Saturday, July 23, 2011

Making Nice

Foam cakes and I have never gotten along.  They tend to bake up with a tough crust, possess little intriguing flavor, require a delicate touch, speed and time in alternating increments, and to top it off, they use up an astounding number of eggs.  But when I came home, I made the rounds and my fate was sealed.  My mum wanted a light and fluffy cake like the ones in Chinese bakeries and my dad wanted (specifically) an angel food cake.  

Of all the foam cakes I have tried or tried to make, angel food cake is the most temperamental.  Bought from bakeries and grocery stores, they tend to be dry, tough and overly sweet.  Made at home, they stick mercilessly to whatever unfortunate pan you chose to inflict them upon.  And then, they are still dry, tough and overly sweet, because reducing the baking time or sugar might result in a cake with no structural integrity, and it might simply fall.

But if my dad asks for angel food cake, he gets angel food cake.  Father's Day passed with a phone call from me with the words, "Happy Father's Day, Dad" and quite literally nothing else, because I had a midterm the next day.  In an engineering class.  Being the mechanical engineer that he is, and the biomedical/mechanical engineering student that I am, I would most definitely die rather than fail an engineering class, even an electrical engineering class.  Thank you, Dad, for trying to teach me all those things about thermodynamics that I was too young to understand.  Maybe I can make it up to you with cake.  For you, I will dive headfirst into mortal combat with angel food cake.

It was in this way that angel food cake and I have finally reached a tenuous truce.  The one that emerged from the oven yesterday was soft, fluffy (even the crust), and tempered flavor- and texture-wise by its light frosting of cocoa whipped cream.  The cake recipe I found from my favorite cake book, called, fittingly enough, The Cake Book by Tish Boyle.  It is called Heavenly Angel Food Cake, but I have rewritten the directions to reflect how I made this cake with some pictures showing my interpretations of frothy, soft peaks, stiff peaks, etc.  

As I was writing this post, I reread the recipe.  I intended to cut the recipe in half, since I thought that 12 egg whites was an insane number of eggs to break for a single cake and my family of four wouldn't be able to eat the whole thing anyway.  However.  I believe that I may actually have forgotten to cut the recipe in half, and only the cut number of eggs in half.  Particularly since I was mixing the cake in a rush.  Sigh.  Cakes and rushing don't normally get along, either.  I'll save that rant for another post.  In any case, the cake actually turned out far better than any of my other angel food cake attempts in the past.  I'll let it go.  This time.

The whipped cream recipe is a bunch of different simple recipes tossed together to create something that I personally find more heavenly than the cake itself.

Heavenly Angel Food Cake from The Cake Book by Tish Boyle

Ingredients:
1 cup sifted cake flour
¾ cup sifted powdered sugar
¼ teaspoon salt
6 large egg whites
1 teaspoon cream of tartar
1 cup superfine sugar (I simply used granulated)
2 teaspoons vanilla extract

Equipment:
2 medium mixing bowls for the sifted sugar, flour and salt
1 sifter or fine-net strainer for sugar and flour
1 large, sturdy mixing bowl, absolutely clean, for egg whites
Electric mixer (or balloon whisk and insane amounts of elbow grease, but I haven't tried)
1 balloon whisk
1 rubber spatula
¼ teaspoon measure
1 teaspoon measure
1 tablespoon measure
¼  cup dry measure
1 cup dry measure
8" round springform pan (originally a 10" diameter tube pan, but I'm not that lucky)

Directions:

1. Whisk together the flour, sugar and salt, then set aside.  Preheat the oven to 325°F.

2. In the large mixing bowl, whip the egg whites until frothy, on low speed. 
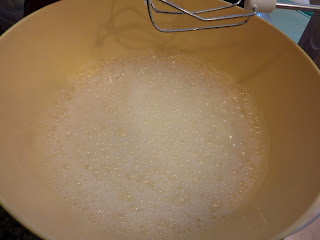
See?  Frothy.

3. Add the cream of tartar, then mix until completely dissolved.  Then mix at medium speed until soft peaks begin to form...

Soft peaks.  They fold back on themselves when you pull the beaters out of the egg whites.
4. And slowly add the superfine (granulated) sugar about 1 tablespoon at a time.  Continue to whip throughout this process until all the sugar is mixed in, then whip at high speed until stiff peaks form...

The stabilized, sweetened egg whites should now look smooth and glossy.

5. Gently fold in the vanilla extract, then the flour mixture, a few tablespoons at a time.  This is where that delicate touch comes in handy.  Try not to deflate the egg whites too much.  A few streaks of flour actually doesn't make much of a difference, but giant pockets will.  Use your judgement as to how much mixing you do.  There's a balance.
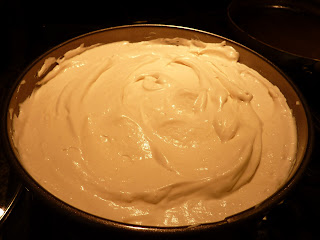
Done (almost) properly and plopped into the pan, the batter looks something like this, only whiter.  Sigh, poor indoor lighting.

6. Scrape the batter into your 8" round springform pan and try to smooth the top.  Bake for about 40 minutes.  When the cake is done, the top is browned and somewhat springs back when you poke the top.  DO NOT poke too hard or you will make a hole in your nice spongy cake.

7. Right before you take the cake out of the oven, have ready an oven rack or something you can put the cake upside down on.  This step is very useful in keeping the angel food cake nice and fluffy.  It also helps that little depression in the center of the cake from growing too much.  Cool the cake upside down for about 1½ hours.

8. To remove the cake, run a slender plastic knife around the side of the cake, literally cutting it away from the pan.  Try to keep the side of the knife pressed against the pan.  Try to use a plastic knife to avoid scratching the nonstick coating of your springform pan, or even just the metal pan.  Scratch = more surface area = more sticking to pan.  Once you remove the ring, you should be able to turn the cake upside down on the serving plate and carefully remove the bottom of the pan.  A thin layer of cake may peel away with it.  That's perfectly fine.  Enjoy your cake!  Decorate, eat, save until it gets moldy (not recommended)!


Cocoa Whipped Cream

Ingredients:
1 cup heavy whipping cream
2½ tablespoons powdered sugar
2 tablespoons cocoa powder
Splash of vanilla extract (about 1/4 teaspoon?)

Equipment:
1 large, sturdy mixing bowl
1 whisk or electric mixer
Copious amounts of elbow grease if whisk is used

Directions:
1. Whip the cream at low speed until slightly thick.  Add the sugar, cocoa and vanilla and increase the speed to medium, then whip at high speed until desired consistency.  I chose to whip it until very stiff, so I could use it for frosting the cake. 

2. Use as desired, whether frosting the cake or simply serving it on the side. 

Look, Dad's cutting it! :D

Notes:

Egg whites separate best cold, and whip best at room temperature.  Separate the eggs fresh out of the refrigerator, then let the egg whites sit for about 30 minutes.

To make sifted cake flour, you can substitute all-purpose flour and cornstarch.  Put two tablespoons of corn starch into the 1 cup dry measure, then fill to the top with flour.  Scoop the flour using another spoon or the ¼ cup measure, then carefully flatten the top by scraping the extra flour off.  Sift this, then carefully measure out the now-cake flour using the scoop and scrape method.  You will have extra "cake" flour left over.  

It's even simpler to make sifted powdered sugar.  Simply sift about ¾ cup powdered sugar, then scoop and scrape measure that.  Of course, you'll have extra.  Just put it back in the bag or box.

I have read in some cookbooks that you are supposed to use a non-porous metal mixing bowl as opposed to porous plastic bowls for beating egg whites for maximum volume so that no trace of fat gets into the egg whites.  In this case, the good mixing bowl was at the time used for marinating raw chicken.  The plastic bowl worked just fine.

The angel food cake will puff up in the 8" round springform pan when it bakes, then fall back down when it cools, particularly sinking in the middle with a depressing-looking crater.  Never fear, for the cake firms up remarkably after proper cooling, even holding its shape when and after I loaded the whipped cream onto it.  The step of letting it cool upside down for an hour and a half seems to be crucial to preventing the cake from sinking any further.  It also allows the cake to keep its fluffy texture. 

The angel food cake refrigerates well for a day.  I believe you are actually supposed to store it "at room temperature for 3 days or in the refrigerator for up to a week" as The Cake Book states, but this cake was put in the fridge to keep the whipped cream "frosting" from going bad, then disappeared in an extra day.

The mixing bowls do not move around as much if a damp towel is placed under the bowl.  I learned this trick from a chef who was kind enough to teach some Girl Scouts how the real cooks do it :)  Yay, friction!

Postscript:  My brother wanted a yellow cake made from a box.  I detest boxed mixes.  I dislike them far more than any foam cake, for at least foam cakes are made from real ingredients.  Box mix cakes taste distinctly familiar, too sweet and one-dimensional with an undertaste of chemicals and are artificially lightened until they feel like dry cotton on the tongue.  They are designed to keep a shelf life longer than any self-respecting shortening and still rise far too much even after they have been beaten to death with a wooden spoon, somewhat like a zombie cake. I made him a chiffon cake instead, one that my mum now calls the "Happy Driving" cake.  This cake was made before I started this blog.  I will try to get that cake onto this blog.

Thursday, July 21, 2011

Change of Plans

The delightful and sometimes frustrating tendency of my plans to change sometimes evolves into spontaneous attempts at recipes.  In this case, I actually did finish reading a research paper given to me last Saturday, but my thermodynamics notes did not happen.  I enjoy being at home, but there is this pleasant and utterly non-productive lack of urgency, deadlines and stress that accompanies the semester.  Restful as it may be, irritation at inactivity often sets in.  However, yesterday, as I procrastinated and spent time with the puppy outside in the backyard, inspiration struck.

Here's the puppy!  Inside, because taking his picture outside is a skill I have yet to master.  He's an energetic pup.  Very, very energetic pup.
For the past couple of days, there has been an extra cup of heavy whipping cream languishing in the fridge.  Combined with a prolific lemon tree in said backyard and my penchant for almond flavors, I thought of a lemon almond ice cream.  The internet bestowed me with a single lovely recipe for :pastry studio's Lemon Almond Ice Cream and of course, I promised myself I would finish reading that paper before I tried it.  About 6 pages of chemicals (that I can barely pronounce) and acronyms (that I had to keep looking up) later, here we are, the slightly altered version of the lemon almond ice cream.

I skipped the lemon juice because I usually use it as an acid for making buttermilk, and the idea of congealed milk wisps floating around my ice cream did not appeal to me. Perhaps next time I will gather my courage and pour lemon juice into milk without cooking the results.

I use this to make buttermilk for biscuits...
However, :pastry studio uses lemon juice mixed directly into the milk and cream as well as another blogger who used the recipe.  Perhaps it's a matter of taste?  I also doubled the lemon zest because I thought it was a waste not to do something useful with the half-stripped lemon.  I guess the juice I didn't use will go to something else, maybe a lemon tart?  Or biscuits.  We'll see.  Oh, and one more thing.  I used 1% instead of whole milk because that's what we had in the house.  I appreciate both icy and creamy ice creams, so it wasn't an issue for me.

Lemon Almond Ice Cream from Pastry Studio
Makes about 3 cups

Ingredients:
5 teaspoons finely chopped lemon zest
1 cup heavy whipping cream
1 cup 1% milk
½ cup + 2 tablespoons sugar
½ teaspoon vanilla extract
½ teaspoon almond extract
One "pinch" salt (I approximated here.  Taste the mixture, then add salt.  When the flavors are intensified, that's enough salt) 

Equipment:
1 vegetable peeler or Microplaner if you have it
1 chef's knife to chop lemon zest if you have no Microplaner (alas, I do not)
1 large, sturdy mixing bowl
1 rubber spatula or balloon whisk
2-cup liquid measuring cup
½ teaspoon measure
½ cup dry measure
1 tablespoon measure 
Refrigerator large enough to accept mixing bowl
Freezer large enough to accept mixing bowl
Plastic wrap for the mixing bowl
Something to stir the ice cream as it freezes (such as a butter knife)

Directions:

1. Zest the lemon and place in the mixing bowl.

Yummy, chunks of lemon zest.  Vegetable peelers are good things.
I love the smell of freshly chopped lemon zest :)

2. Mix all the ingredients in the mixing bowl.  Cover with plastic wrap and refrigerate overnight.  The flavors should meld together during this time.


3. Freeze in ice cream maker or in the freezer.  If using the freezer, put the whole bowl in.  Take it out and stir every 30 minutes, particularly incorporating the frozen bits along the side of the bowl.  I got this very helpful tip from the blogger at The College Bakery.
I realize it looks like mashed potatoes.  They taste radically different, unless your normal potato seasonings are lemon and almond and sugar.  There was a photo I took that showed the ice cream in scoops in a bowl, but for some reason the lighting was very strange.  Perhaps I will retake that particular photo.
Enjoy!  

Notes: 

The ice cream has a tendency to become icy rather than creamy, either from my use of 1% milk instead of whole milk, or constantly forgetting to mix it every 30 minutes (or possibly both).  

It also melts rather swiftly.  I think this is because the ice cream is not made from cooked custard, which freezes hard and has a lovely creamy texture.  

Flavorwise, it is perfectly balanced between lemon and almond, but a little too sweet for my liking.  This probably results from skipping the lemon juice.   Next time, I will probably cook the custard instead and either reduce the sugar by about half or add the lemon juice.  

My last note would be that there is finely chopped lemon zest densely scattered throughout the ice cream, which leaves your mouth full of chewy little bits.  I happen to like these bits, but if you do not, keep the lemon zest in as large pieces as possible when making the ice cream mixture.  This is one of those nice times when not having the right tool is useful.  Right before you freeze the ice cream, strain it into another bowl to remove the lemon bits.  The lemon flavor may be slightly diminished, but your ice cream will be pleasantly homogenous (well, as homogenous as icy-creamy-melty homemade non-machine-churned ice cream can be!).

Postscript:  My boyfriend is going to try this recipe, all the way over on the other side of the country.  I'm excited to see how his ice cream turns out! :D

Wednesday, July 20, 2011

Vegetarian Substitutions

Although this blog will mostly track food made in a dorm kitchen, right now it's blissfully summer.  At home, I have much more access to vegetables and cooking equipment and consequentially, am somewhat more experimental with main dishes.  This dish is modified from a lovely recipe on Crumb Blog.   

Last Saturday my family went to the farmer's market, and I spotted baby eggplants.  With the confidence of a misremembered recipe, I asked my mum to purchase some.  I came home to the realization that the stuffed eggplants called for ground lamb and bell peppers among other things, which we did not have.  Also, I don't eat most meat.  Hmmm.  Well, changes are an essential part of life, as my genetic engineering professor last spring proclaimed over and over. The following recipe uses leftover rice instead of lamb and omits a bunch of other delicious-but-currently-unavailable ingredients, like pine nuts and feta cheese. 

I do wish I had taken more photos of the process, because the rice looked quite beautiful and colorful.  If I make this dish again I will add more photos, when I'm not rushing to get it on the table.  I still wound up microwaving it for 3 minutes after it came out of the oven, but that's probably because I only baked the eggplants for 20 rather than 30 minutes.  The original recipe calls for 25-30 minutes in the oven.

Ingredients:
4 baby eggplants (3-4" long)
Salt
Oil for saute and brushing on eggplants
1 small onion, finely chopped
2 or 3 cloves garlic, minced
1 cup cooked rice
1 plum tomato, diced
Black pepper for seasoning

Equipment:
Cutting board
Chef's knife
Plate large enough to hold 8 baby eggplant halves
Paper towel
Frying pan
Frying spatula
Baking pan large enough to hold 8 baby eggplant halves

Directions:
1. Cut each eggplant in half lengthwise.  Scoop out the insides, leaving a shell approximately ½" thick.  Rub the inside of each shell with salt and leave upside down on the towel on the plate.  Chop the insides roughly and set aside.

2. Heat the oil in the frying pan and saute the onion until soft.  Meanwhile, preheat the oven to 375°F.


3. Toss in the garlic and saute until the garlic starts to get a little golden.

4. Toss in the rice and eggplant pieces and cook until rice doesn't stick together and eggplant is soft.  Turn the fire off, then toss in the tomatoes.

5. Season with black pepper and maybe a little salt, to taste.

6. Arrange the eggplant halves in the baking dish and spoon the rice into the eggplants.  You'll probably end up with a little extra rice.  It makes an excellent snack or lunch or something.  Put the dish into the oven and bake for about 30 minutes.

It will more or less look like this :) Maybe a little less pink.

Hello World

Hello world!  In anyone's first C program, those are always the first words printed.  Beloved printf command, you bring new C programmers to the computer world as surely as a biological birth.  Despite this introduction, however, the remainder of this blog aims to chronicle recipes suited for college life when the nearest kitchen is three arduous flights of stairs away.  Without any more strange metaphors and irrelevant topic changes, here is a recipe from today, slightly altered from the one found on Allrecipes.com.

These recipes always usually come with the most efficient directions possible and a list of equipment required for these directions.  The directions are streamlined to produce the least amount of dishwashing possible.  This particular recipe is pretty simple, but do use common sense.  Technically you can use only the ½ teaspoon measure for the sugar, but personally I am very easily distracted and would probably miscount the number of ½ teaspoons needed (6, if anyone's wondering, 3 teaspoons to 1 tablespoon).  But in this case, it's also just sugar in a pancake, and may or may not make a difference in your recipe if there is a ½ teaspoon more or less.  Unlike your physics lab, 8.33%, 16.67%, 25.00% or even a 50.00% error won't tank your results.

Ingredients:
1 egg
¾ cup milk
2 tablespoons sugar
½ teaspoon salt
1 cup flour
1 teaspoon baking powder
½ teaspoon baking soda
A little oil for frying (optional if your frying pan is nonstick)

Equipment:
1 rubber baking spatula or balloon whisk
2-cup measuring cup
1 cup dry measuring up
½ teaspoon measuring spoon
1 tablespoon measuring spoon
1 frying pan
1 frying spatula (or the skill to flip pancakes in a pan, something I never fully learned despite multiple Girl Scout competitions)

Directions:

1. Beat the egg by cracking it into the measuring cup, then roll the rubber spatula or whisk between your palms to beat it with minimal mess.  Add in the milk and mix thoroughly in the same fashion.

2. Place all of the dry ingredients on top of the liquid.  Mix or whisk until slightly lumpy.

3. Allow batter to rest for 15-30 minutes (or as hunger and impatience allow).

4. Meanwhile, heat pan or griddle to approximately medium-low fire.  Once hot, pour a little oil or butter into the pan and heat.

5. Without stirring the batter again, drop rounds into the greased pan.

6. Cook until bubbles appear on the surface, then flip and cook approximately another minute.  Do not flip more than once for optimum fluffiness. 

Serve and devour before they cool.  But when they do cool, store at room temperature covered.  They make excellent snacks for later, or bread for meal substitutes when one has a midterm in 6 hours.

Photos of pancakes created from this recipe to follow.